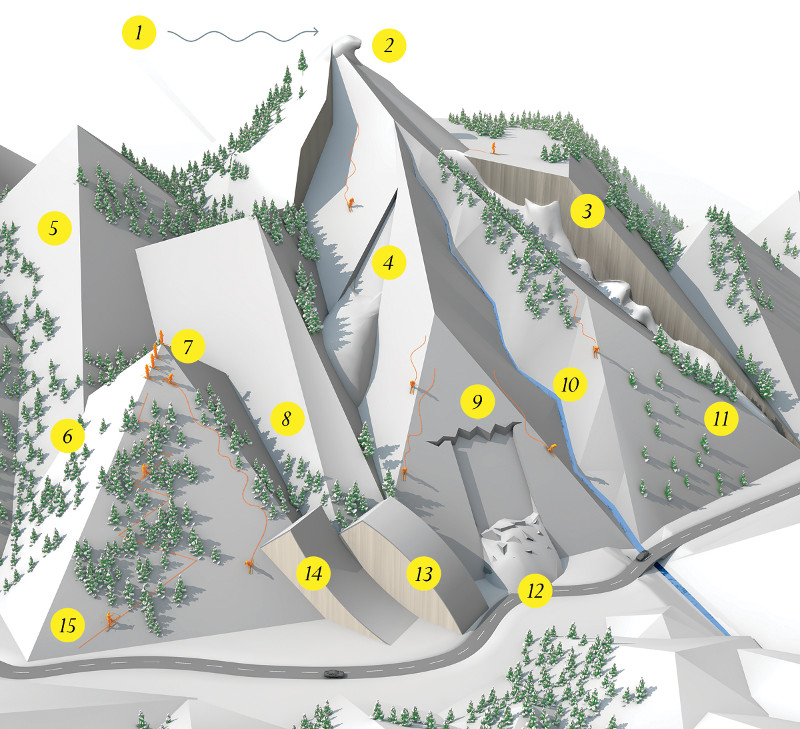
Outside Magazine just published this great avalanche terrain map. The text below corresponds to the numbers and locations in the image above and helps to identify hazards and safe zones in avalanche terrain. The image, numbers, and text together create a great crash course in how to ascend and descend avalanche terrain.
ENTER AT YOUR OWN RISK
1. Wind can displace tremendous amounts of snow, in some cases affecting the nature of the snowpack much more than a new storm. Wind-loaded slopes can be dangerous, while wind-eroded slopes are usually fairly safe.
2. Cornices are obvious indicators of the prevailing wind direction. Downslope of a cornice, you’ll often find a wind slab—a cohesive layer of wind-deposited snow. Big dumps, high winds, and recent warming can cause cornices to break off and trigger an avalanche.
3. Large buried rocks, patches of brush, and cliff bands tend to be weak, shallow zones in the snowpack. Skiing above a cliff band is never a good idea, especially if the slope is avalanche prone.
4. Loose-snow avalanches, one of two main types of avalanches, often called point releases, usually start from a single source—often your skis—and fan outward.
5. Over time the sun can help consolidate layers within the snowpack, making them more stable. It can also create dangerous layers like sun crust. Pay close attention to slope aspect—snowpack can vary dramatically depending on how much sun it gets.
6. Surface hoar is a layer of feathery crystals that sprout from exposed snow on cold, clear, calm nights. While beautiful, the crystals don’t bond well and are notorious for causing weak layers that can persist for weeks.
7. Before descending an avalanche-prone slope, identify safe zones, places where members of your group can watch one another from a secure location, such as a ridgetop or a tight cluster of trees on a low-angle slope. Descending one at a time minimizes the group’s exposure and ensures the maximum number of searchers if someone gets buried.
8. The prime avalanche angle for a slope is 38 degrees, with most slides occurring between 35 and 45 degrees. Slopes less than 30 degrees rarely slide.
9. Slab avalanches can propagate farther and create larger slides. The basic recipe is a slab, a weak layer, a bed surface, terrain steep enough to slide, and a trigger.
10. Terrain traps are features that increase the consequences of getting caught in an avalanche. Concave traps like streambeds and gullies allow avalanche debris to pile up, making a deep burial more likely. Plus, icy streams can cause hypothermia.
11. Small, young, widely dispersed trees, especially those with limbs growing only on the downhill side, are a red-flag warning of a frequent slide path.
12. Avalanche paths that spill over roads can cause a depression zone on the flat surface, where debris piles up, making it harder to perform a rescue.
13. The snowpack often isn’t as cohesive on a convex slope, commonly called a rollover. Gravity’s mission—to pull snow downhill—gets help from the curvature, making it more prone to sliding.
14. A concave slope naturally compresses snow—an important terrain feature that can add strength to the snowpack.
15. On the way up, using an established route, either a skin track or a boot-pack, through trees saves the slope for fresh tracks and keeps you out of the path of any slides. Evaluate avalanche terrain on your ascent and try to choose the route with the least exposure.