When talking about avalanches and backcountry risk, the term “weak layer” seems to come up quite a lot. In this article, I’ll delve into what a temperature gradient is, how it forms, and why it can be your best friend or worst enemy, depending on the day. Scroll all the way down for a TL;DR!
First of all, what exactly is a weak layer? A weak layer is essentially a layer in the snowpack where the snow is weaker than its weaker relative surrounding layers. There are several different types of weak layers, but the ones primarily associated with temperature gradient are known as facets.
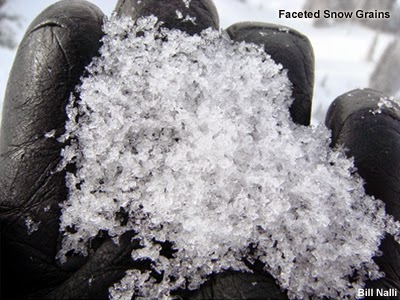
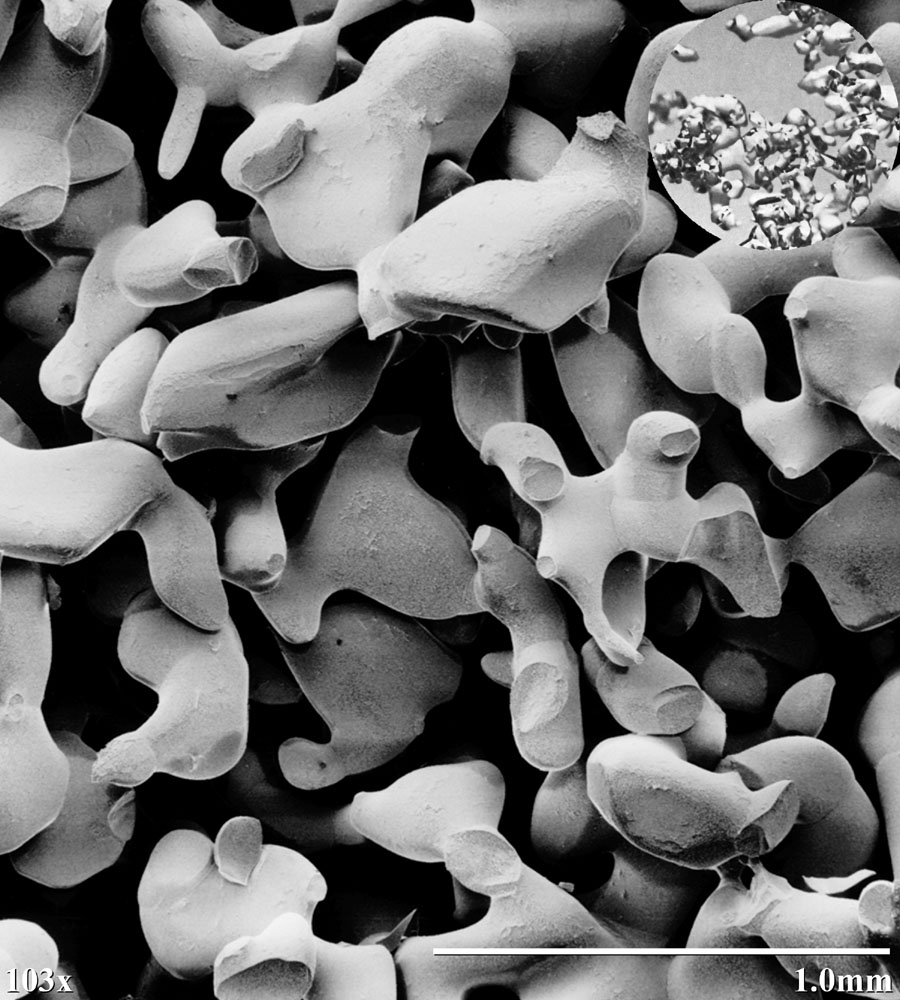
Facets are essentially very loose, dry, unconsolidated snow crystals. If you’ve never seen these crystals, they are terrible for making snowballs since the snow doesn’t stick to itself. Facets are a fairly common weak layer, yet they still catch dozens of backcountry recreationists by surprise each year.
So how exactly do facets correlate to avalanches? When a large slab forms on top of faceted snow, the facets get loaded with weight above them. Sometimes this loading is enough to trigger them naturally, but often not. The facets are actually rather strong when mass is gradually loaded on top of them. Think about carefully and slowly placing a book on top of four eggshells: they can hold the book’s weight. However, when a skier comes along, they are putting force on the snowpack very rapidly. In the eggshell analogy, this is like dropping that book from a 3 story building onto the eggshells. The result? Shattered eggshells.
So facets are very unstable when weight is rapidly added to them. This is obviously quite problematic for backcountry recreation. So how exactly do facets form?
Throughout the entire winter, the ground stays at a near-constant 32F. The air, however, can dip far below 32F. What this creates is a temperature gradient. As long as the air is below 32F, the air near the ground will almost always be warmer than the air near the snowpack’s surface. Warm air can hold more moisture than cold air, meaning there is typically more water near the surface than there is in the air. The closer to the surface, the warmer the air, and therefore the more moisture there is. Just like anything else of high and low concentration, natural diffusion takes place here. Water from high moisture content areas lower in the snowpack travels up to the dry air near the surface. The effect that this has is drying out the snow that is high in moisture content. Without the necessary moisture that the snow crystals need to bond together and strengthen, the crystals are left loose and very problematic.
It is important to note that snow doesn’t need to be near the surface to facet. There is a specific formula that is used to determine if faceting is occurring in the snowpack. For every 10cm of snow, if there is a temperature difference of 1C or more, the temperature gradient is large enough that a vapor pressure gradient forms and faceting occurs. This can occur at any height in the snowpack, not just near the surface.
Well, temperature gradients sure suck, you may be thinking. But not always! Temperature gradients can work in your favor as well. If the temperature gradient in a 10cm segment of the snowpack is ≤1C, faceting is not occurring. In fact, moisture is abundant in the snow, and the opposite occurs! The moisture bonds the snow crystals together and makes the layer cohesive, increasing stability!
So, generally speaking, cold, clear nights are rather bad for the snowpack. The temperature gradient will cause the snow to “rot” (another word for faceting behavior). However, what temperature faceting will occur really depends on the depth of the snowpack. Let’s make an example scenario to explain:
Snowpack 1 is about 120cm deep. The external air temperature is -5F. To calculate the average ratio through the entire snowpack, we can use the following formula: (grndΘ[0]-airΘ)/(h(snowpack)[cm]/10). Plugging in our scenario, we get (0-15)/(120/10), or 15/12. 15/12 is equal to 1.25. This value is the average temperature gradient per 10cm. Since 1.25 is above our 1C/10cm threshold for faceting to occur, we can expect this snow to facet.
Snowpack 2 is 200cm deep. The external air temperature is still -15C. Plugging these numbers into our formula, we get (0-15)/(200/10) or 15/20, which is equal to .75. This is below our 1C/10cm threshold for faceting to occur, so we can expect this snowpack to gain strength in the given conditions. A deeper snowpack smooths out the temperature gradient and makes faceting harder to occur.
To recap, here are the main things that were covered in this article. A strong temperature gradient in the snowpack causes a vapor pressure gradient to form, which draws moisture up through the snowpack, which causes snow to sinter and dry out, which makes it loose and unconsolidated. This loose and unconsolidated snow enhances avalanche risk. A smaller temperature gradient causes snow to strengthen and decreases avalanche risk. A deeper snowpack makes facets less likely to form. Got questions? Leave a comment; I’ll get back to you as soon as I can!
Hi Dave. Thank you for the catch! You are absolutely correct that I forgot to convert from F to C!
Hi Clay, I know this is an older article, but I stumbled across it and noticed you need a units change to apply a change in F to the change in C in your formula. After many decades of touring I still have not converted my brain to think of temperature and snowpack depth in metric units, it might be too late for me, lol. Where you have the temperature change from 32 to 17F = 17F change, convert the 17 F change to C by dividing 17 by 1.8, giving you a change of 8.3C across the snowpack. 8.3C across 120cm is a 0.7C per 10cm gradient so you would not expect this snowpack to facet at 17F (except for at the surface in some cases). (12/10=12 sections of 10cm. 8.3/12=0.7C per 10cm) A 120 cm snowpack is about 4 feet which will hit the 1C/10cm at about 10F.
I’m confused by this
“As long as the air is below 32F, the air near will almost always be warmer than the air near the snowpack’s surface. Warm air can hold more moisture than cold air, meaning there is typically more water near the surface than there is in the air. The closer to the surface, the warmer the air, and therefore the more moisture there is. ”
Please correct me if I’m wrong. Shouldn’t this be the “air near the GROUND will almost always be warmer than the snowpack surface. The air near meaning what ? Are you trying to say the air near the ground?
Also the closer to the surface the warmer the air. Aren’t you trying to say the closer to the ground the warmer the air , the warmer the air toward the ground therefore the more moisture there is. This to me creates the temperature / vapor gradient.
Yes, you are correct. Thank you for pointing out this typo!
The temperature gradient causing faceting, but how about the actual temperature of the snowpack. Will faceting occur at any temperature below freezing?